Install Rancher on Azure Kubernetes Service (AKS)
Rancher is a free, open-source, Cloud Native project that greatly simplifies the life of Kubernetes cluster administrators and users.
This post will present the steps to have Rancher up and running in an AKS cluster.
I’m using a managed service as it’s the easiest way to have a Kubernetes cluster with everything required (storage, networking, load balancing), a good documentation and all options to interact with (web UI, CLI, IaC).
Rancher can run in a container, with Docker for example, but it runs best in a Kubernetes cluster. It’s also a best practice to install it on a dedicated management Kubernetes cluster (with other tools like Keycloak).
The steps assume you have Azure CLI, kubectl and Helm installed. All this actions can be automated with Terraform or a GitOps approach but for education purposes it’s good to start with the CLI to look at each steps.
1. General configuration
# defines variables
AZURE_LOCATION=westeurope
CERT_MANAGER_VERSION=v1.12.4
EMAIL_ADDRESS=my@own.email
KUBERNETES_VERSION=v1.26.6
NODE_COUNT=2
RANCHER_VERSION=2.7.6
RESOURCE_PREFIX=bth-tmp20230932
SUBSCRIPTION_ID=XXXXXXXXXXXX
VM_SIZE=Standard_D2s_v3

# displays versions
az version
kubectl version
helm version

# adds helm repositories
helm repo add devpro         https://devpro.github.io/helm-charts
helm repo add jetstack       https://charts.jetstack.io
helm repo add ingress-nginx  https://kubernetes.github.io/ingress-nginx
helm repo add rancher-latest https://releases.rancher.com/server-charts/latest
helm repo update
2. Kubernetes “management” cluster
# authenticates to Azure (will open a window in your browser)
az login

# makes sure the right subscription will be used
az account set --subscription $SUBSCRIPTION_ID

# creates the resource group
az group create --name rg-${RESOURCE_PREFIX} --location ${AZURE_LOCATION}

# create AKS resource (Kubernetes cluster managed by Azure)
az aks create \
  --resource-group rg-${RESOURCE_PREFIX} \
  --name aks-${RESOURCE_PREFIX} \
  --kubernetes-version ${KUBERNETES_VERSION} \
  --node-count ${NODE_COUNT} \
  --node-vm-size ${VM_SIZE}

# adds cluster credentials to local kubectl config
az aks get-credentials --resource-group rg-${RESOURCE_PREFIX} --name aks-${RESOURCE_PREFIX}

# fixes permission issues on WSL
chmod 600 ~/.kube/config

# makes sure we can query the cluster
kubectl get nodes
3. Ingress Controller
# installs NGINX Ingress (the annotation is a fix required for Kubernetes 1.24+)
helm upgrade --install ingress-nginx ingress-nginx/ingress-nginx --namespace ingress-nginx --create-namespace \
  --set controller.service.annotations."service\.beta\.kubernetes\.io/azure-load-balancer-health-probe-request-path"=/healthz

# makes sure everything is ok
kubectl get services -n ingress-nginx

# stores the external public IP (must not be null!)
NGINX_PUBLIC_IP=`kubectl get service -n ingress-nginx ingress-nginx-controller --output jsonpath='{.status.loadBalancer.ingress[0].ip}'`
4. Certificate management
# installs the CRDs
kubectl apply -f https://github.com/cert-manager/cert-manager/releases/download/${CERT_MANAGER_VERSION}/cert-manager.crds.yaml

# installs cert-manager
helm upgrade --install cert-manager jetstack/cert-manager \
  --namespace cert-manager \
  --create-namespace \
  --version $CERT_MANAGER_VERSION

# makes sure the 3 pods are in Running status
kubectl get pods --namespace cert-manager

# creates cluster issuers
helm upgrade --install letsencrypt devpro/letsencrypt \
  --set registration.emailAddress=$EMAIL_ADDRESS \
  --namespace cert-manager

# makes sure the 2 cluster issuers are Ready (True)
kubectl get clusterissuer -n cert-manager
5. Rancher installation
# installs Rancher
kubectl create namespace cattle-system
helm upgrade --install rancher rancher-latest/rancher \
  --namespace cattle-system \
  --set hostname=rancher.${NGINX_PUBLIC_IP}.sslip.io \
  --set 'ingress.extraAnnotations.cert-manager\.io/cluster-issuer=letsencrypt-prod' \
  --set ingress.ingressClassName=nginx \
  --set ingress.tls.source=secret \
  --set ingress.tls.secretName=rancher-tls \
  --set replicas=2 \
  --version $RANCHER_VERSION

# waits for the installation to complete
kubectl -n cattle-system rollout status deploy/rancher

# retrieves the generated password (to be copied)
kubectl get secret --namespace cattle-system bootstrap-secret -o go-template='{{ .data.bootstrapPassword|base64decode}}{{ "\n" }}'

# displays the Rancher URL
echo "https://rancher.${NGINX_PUBLIC_IP}.sslip.io/"
6. Rancher initial setup
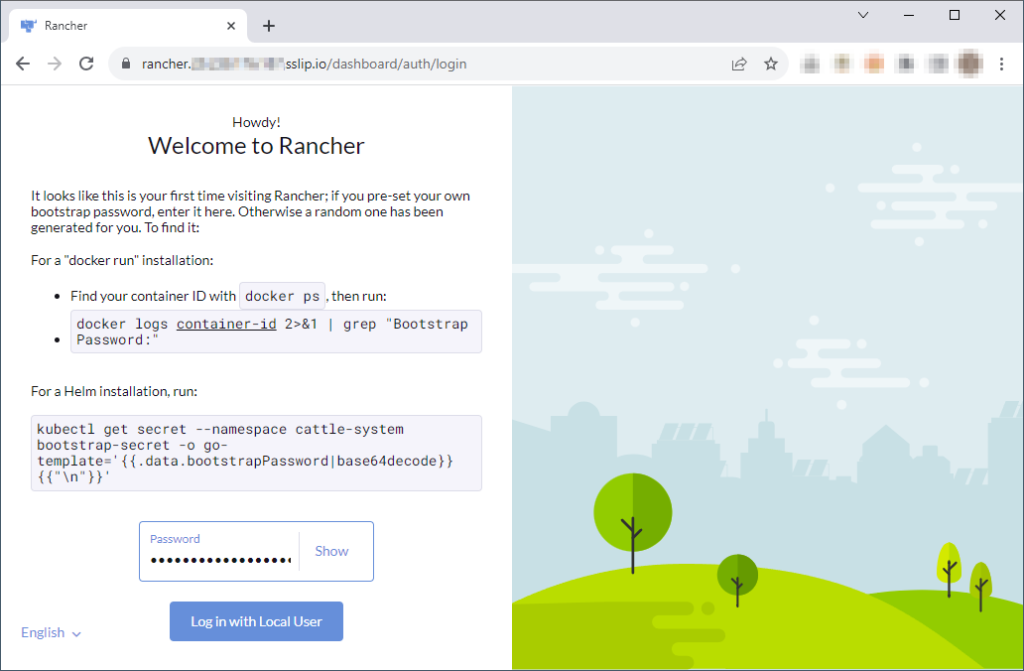
Open the displayed URL in a browser, paste the password we just copied and click on “Log in with Local User”.
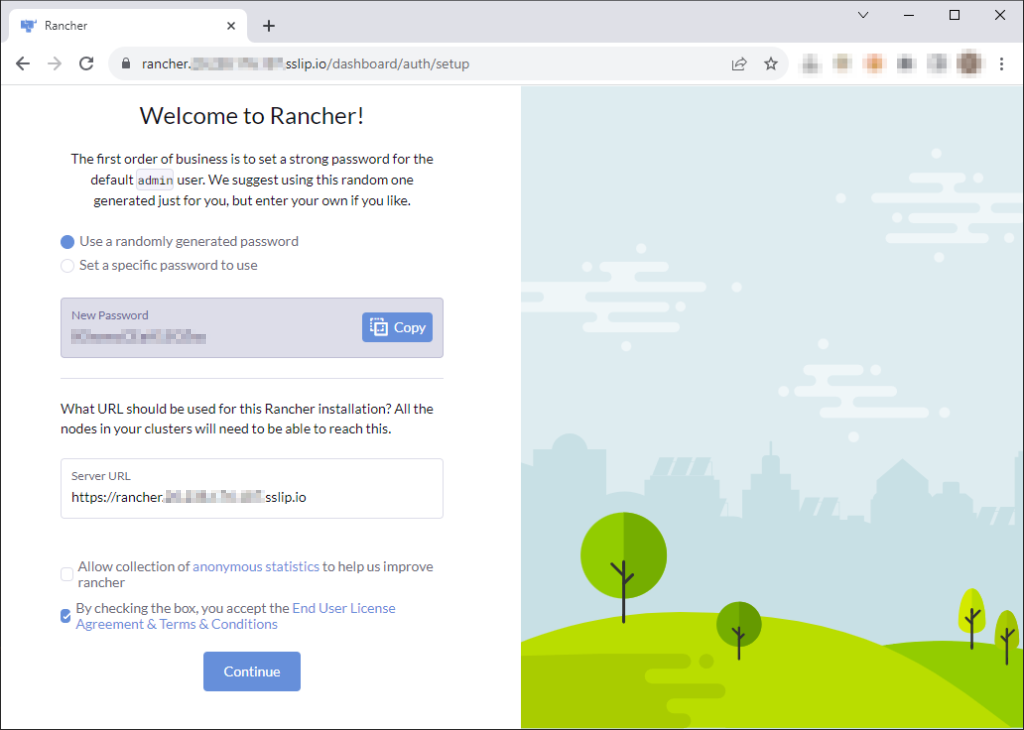
Define the admin password, check the box and click on “Continue”.
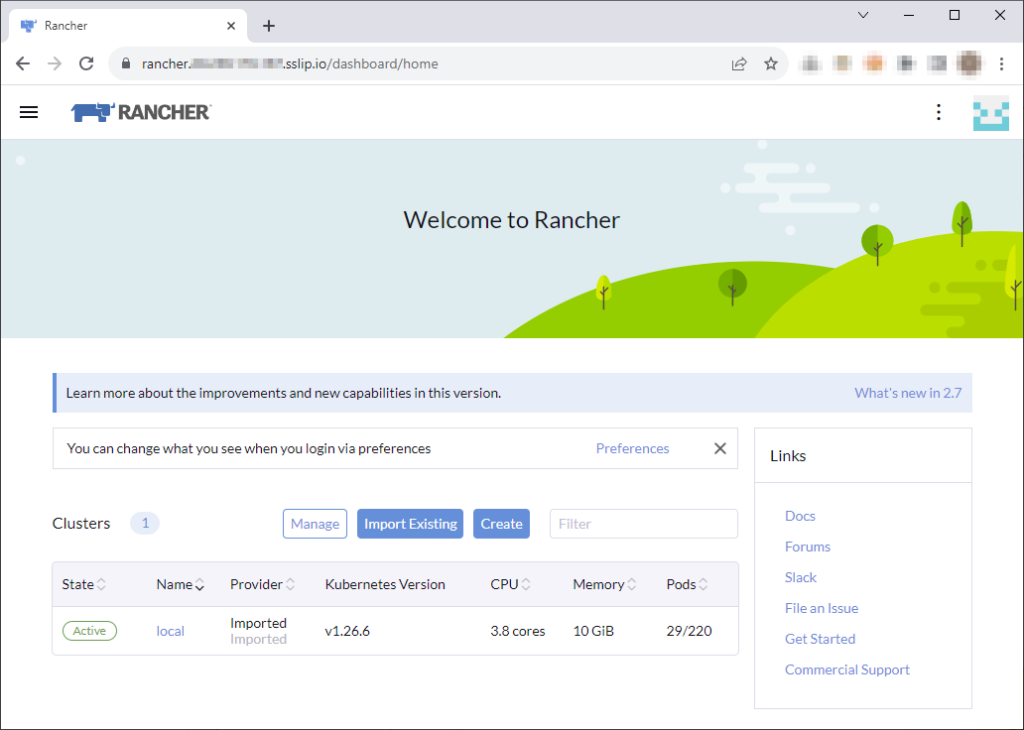
Et voilà, Rancher is running and you can explore “local” cluster (the one running Rancher!).
7. Clean up
# deletes the cluster
az aks delete --name aks-${RESOURCE_PREFIX} --resource-group rg-${RESOURCE_PREFIX}

# deletes the resource group
az group delete --name rg-${RESOURCE_PREFIX}

# cleans the local kube config file
kubectl config unset users.clusterUser_rg-${RESOURCE_PREFIX}_aks-aks-${RESOURCE_PREFIX}
kubectl config unset contexts.aks-${RESOURCE_PREFIX}
kubectl config unset clusters.aks-${RESOURCE_PREFIX}
References:
– Install/Upgrade Rancher on a Kubernetes Cluster
– Stack overflow question #74247498

- Install Rancher on Azure Kubernetes Service (AKS) - September 25, 2023
- Automate NeuVector installation and management with Fleet – The GitOps way - August 25, 2023
- AKS startup error: Token refresh failed with invalid client secret error - August 22, 2023